Chapter 7 – The Somme.
To the Somme.
The 141st Brigade Operational Orders for 10th September 1916 intimated that the Brigade would relieve 3rd Brigade in the support brigade area on 11th September. One officer per battalion was detailed to proceed to the 3rd Brigade Headquarters in Happy Valley where guides would indicate the area to be occupied.
After reconnoitring the position, the officers were to return to Fricourt Circus to lead in their respective units. In accordance with orders, at 8am on 11th September, the London Irish moved half a mile southwards from Bresle to the Amiens-Albert road and then marched eastwards towards the battle line. A journey of approximately four miles brought the troops into Albert. The town was famed throughout the British Army for the gilded figure of the Virgin and Child, which surmounted the fabric of the Cathedral and some injury to the anchorage of the statue had caused the figure of the Madonna to bend over from its base in a horizontal plane. Thus, the thousands of troops that marched along the road towards the battle area beheld the dramatic spectacle of the Virgin with outstretched arms seemingly holding out the Holy Child for their view. The troops took great interest in the statue as it was popularly believed that the war would end when the figure fell.
After leaving Albert, the Battalion moved by platoons at 200 yard intervals and eventually, in company with the remainder of the Brigade, reached the “Y” support area, which was situated in and around Bottom and Mametz Woods.
It was impossible to escape the signs of war: villages were flattened heaps of rubble, the ruined fields slashed and scarred with derelict trenches; the woods, a sorry conglomeration of tangled and splintered timber. All around were masses of troops, transport and guns and it was not difficult to appreciate that here was the fringe of the area in which the greatest battle in the history of the world was being fought.
The Situation.
The attack on the Somme, which opened on 1st July 1916 was one of a number of offensive operations planned by the Allied Powers to take place during 1916. In Russia and Italy, heavy assaults were to be launched against the Central Powers, while in France, the British and French were to embark on a large scale attack north and south of the river Somme.
In May 1916, the Central Powers forestalled the Allies, by an Austrian attack in the Trentino, which achieved a great deal of success – the Italians being forced back to Asiero and Asiago. On the Western Front in February, the Germans, under Crown Prince William, delivered what was to be a knockout blow against the French at Verdun. The desperate resistance of the French against the repeated assaults of the Germans entailed enormous losses on both sides and the French Division – which were originally intended for use in the offensive on the south side of the Somme were gradually drawn away and employed in the Verdun battlefields.
In June, the Russians attacked in Galicia and their success materially aided in reducing the enemy pressure at Verdun. The British offensive on the Somme, which was to been complementary to the proposed French attacks, was, by force of circumstance, to become of first rate importance.
Field Marshal Sir Douglas Haig, the Commander in Chief, launched attacks with the intention of relieving the pressure at Verdun, preventing the dispatch of enemy troops to the other theatres of war and wearing down the strength of the enemy.
During the whole of July and August, pressure against the Germans on the Somme was maintained and fearful casualties on both sides were suffered, important strategical results were obtained but, in proportion to the expenditure of men and materials, territorial gains were small. No spectacular breakthrough was achieved owing to the absence of the surprise element, the strength of the enemy positions and the skills and courage of the defenders – notably at Thiepval, Guillemont, Delville Wood and High Wood.
The Attack Plan.
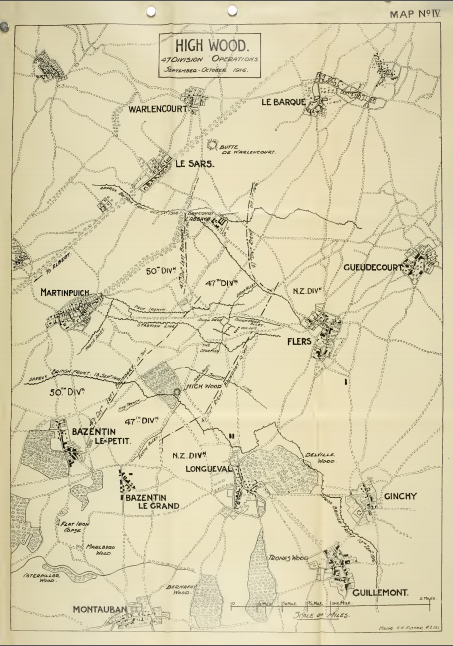
The forward movement, in which the 47th Division was to participate, was to be carried out by the 4th Army (General Rawlinson) and comprised an attack on the enemy defences between Combles and Martinpuich with the objective of seizing Morval Les Boeufs, Guedecourt and Flers.
Three Army Corps were employed:
3rd Corps on the left,
14th Corp in the centre, and
15th Corps on the right.
The 14th and 15th Corps were to attack in a northerly direction, while the 3rd Corps secured the high ground on the left and formed a hinge in which the 14th and 15th Corps could swing forward in a north easterly direction.
47th Division comprised the right flank division of the 3rd Corps and it was hoped that the assault by the 4th Army, which was to be pressed home with the utmost vigour, would result in a decisive victory and would open the country for the use of cavalry. This optimism was based on the assumption that, for two and a half months, the enemy had been worn down, his morale was shaken and that there were few fresh reserves available.
On the 3rd Corps front, 50th and 47th Divisions were in the line on the left and right respectively – with the object of seizing the high ground, (ie Martinpuich-High Wood) and establishing a strong defensive flank to protect the advance of the troops. On the right, the task of the 47th Division comprised an attack on a two brigade front with 141st Brigade on the left and 140th Brigade on the right, the first objective was the Switch Line and the High Wood; the second objective was Starfish and Flag Lane; the third objective, the Division was required to take was the Cough Drop, Drop Alley and Flers Line.
141st Brigade had two battalions in the front line: London Irish (18th Battalion) on the left and the 17th Battalion on the right, The 17th and 18th Battalions were required to take the enemy front line on their frontage and High Wood. The second objective of the Brigade – the Starfish Line – was to be assaulted by the 19th Battalion on the left and 20th Battalion on the right.
These Battalions were to advance from their assembly positions at zero and occupy the front line trenches, vacated by the 18th and 17th Battalions respectively. At 40 minutes after zero, they were to move forward over no-man’s land, pass through 17th and 18th Battalions and, following paper trails laid by the 17th and 18th Battalion, through the wood and, under the protection of an artillery barrage, capture the second objective.
Two hours after zero, the 19th Battalion and the 20th Battalions were to advance again, behind a protecting barrage, with a view to seizing the third objective: the enemy works knows as the Coughdrop, this being the 20th Battalion’s task. The 17th and 18th Battalions were required to mop up all enemy groups in High Wood prior to the advance by the 19th and 20th Battalions to the second objective and the latter Battalions were to leave a trench garrison in the second objective before advancing on to the third line.
Artillery preparation commenced with a bombardment on 12th September, which continued at intervals up to the day of assault. On the day of assault, the artillery fire was to become intense and a barrage placed 150 yards beyond the front line. At zero plus one minute, the barrage was to move into the Wood at the rate of 50 yards a minute until it had crept further forward to a point 150 yards in the rear of the first objective – where it was to remain until one hour after zero. For the attack on the second objective, the barrage was to move on from zero plus one hour and eventually stop on an east and west line through the Coughdrop. For the final assault, the barrage was to be substituted by an intense field artillery fire at two hours after zero. On lifting off the third objective, the guns were required to form a barrage 200 yards beyond the objective.
Orders for given for the concentration of strong points and for machine guns to be pushed up during the attack. In addition to the artillery fire, overhead machine gun fire was to be provided. Four machine guns were to fire from a position selected near Bazentin-le-Petit and four were to engage the enemy from a position to be chosen, in the vicinity of the windmill west of Longueval.
Contact aeroplanes were ordered to fly over the battle area as soon as light permitted and flares were to be ignited by the troops to indicate the progress of the assault, on request, or when signalled for, by Very lights fired from the planes. To assist the advance and in any necessary mopping up, four tanks were to precede the infantry. These tanks were timed to reach the objectives four to five minutes before the assaulting Battalions – and were to pass through “lanes” 10 yards wide in the barrage. Specific instructions were given, however, for the programme of the assault to be carried through by the infantry irrespective of any failure by the tanks.
Bois de Foureaux, better known as High Wood, had an evil reputation. On the verge of being captured on 14th July by the 7th Division, it had remained in enemy hands despite repeated attacks. Division after Division had, after heroic efforts, recoiled from its bloody ramparts leaving the flower of their ranks dead and dying in the waste of shell torn earth and wire that constituted no-man’s land.
The Wood was the key to a considerable portion of the German defences and the resolute enemy defenders had, by their skilful dispositions and successful use of a concentration of machine guns and artillery, held their own against all comers. The grisly heaps of human debris which encumbered the maze of trenches in front of the Wood testified alike to the determination of the British High Command to secure the Wood and to a parallel like determination on the part of the defenders to contest every inch of ground. Two months of sanguinary effort had advanced the British line to a point, which took in the southern half of the Wood.
Of the Wood, very little wood remained but a miserable aggregation of charred and splinted tree stumps and made hideous by putrefaction, lingering gas fumes and the reek of high explosive. The spectacle was one of overwhelming ruin and corruption.
The task facing the 47th Division was of no mean order and its character was realised by all ranks. Great hopes were held that the tanks would give a good account of themselves and that, with their aid, the Division would succeed in taking and holding their objective according to plan. On the afternoon of the 14th September, the 140th and 141st Infantry Brigades relieved the 142nd Brigade in the High Wood sector. The London Irish reached Rendall Avenue at 315pm and, thereupon, took over the left sub-Sector with two companies in the front line and the new assembly trenches and two in reserve in the length of Chester Street – which ran north west from the junction of Chester Street with Rendall Avenue.
The Battle for High Wood.
17th Battalion took over the right sub-Section in the front line, 19th Battalion moved up to Mill Street and 20th Battalion moved to the north east corner of Mametz Wood in readiness for their forward movement later.
So far as the London Irish was concerned, the relief passed off smoothly and no casualties were incurred up to midnight of 14th/15th September. During the night, there was sporadic sniping and some shell fire. Patrols moved about in no-man’s land and final preparations for the assault were completed. The four tanks, which were to accompany the Brigade, moved up and reported that they had reached their starting point and were ready to advance at the time appointed: 620am on the 15th.
At 620am precisely, the artillery barrage opened on the first objective. Almost immediately, despite the fine brightness of the morning, smoke emitted by the shells obscured the enemy front line, making observation impossible.
On the London Irish front and the front of the 17th Battalion, the two tanks, which should have preceded the assault moved forward, but one tank stuck in the front line and other was unable to make progress over the battered tree trunks and came to a standstill just outside the front line.
Despite the failure of the tanks, the attack was launched and, at 630am precisely, the leading waves of London Irish and 17th Battalion emerged from the trenches, followed by the remainder of the assaulting troops. Owing to the close proximity of the enemy line and the special arrangement for leaving wide lanes in the artillery fire so as to prevent injury to the tanks, the curtain of fire, under which the infantry advanced, was inadequate.
On the London Irish front, the artillery assistance was almost negligible and, as the inevitable result, the enemy machine guns were able to pour an intense fire into the attacking waves and as soon as the men crossed the parapet, thy were mown down. Captain Maginn, Lt Cunningham and the Bombing Officer gallantly led the rushes but were knocked out. Captain Maginn being killed instantly and Lt Munro was so severely wounded after crawling round trying to aid the wounded, that he died a few days later.
All along the front of High Wood, the enemy machine guns were intact and accurate fire inflicted enormous casualties. The attack of the 17th and 18th Battalion and also the left of the 140th Brigade (15th Battalion) collapsed.
The survivors, raking cover in shell holes doggedly engaged the enemy with their rifles but could not obtain anything like the superiority of fire against the German machine guns, which swept the intervening ground with terrible persistence and accuracy.
Lt-Col AP Hamilton, Commanding Officer of the 19th London Regiment and the London Irish’s Adjutant, immediately organised a number of men and made a gallant attempt to rush the enemy front line but was unsuccessful. Col Hamilton was killed at once together with every man who went forward with him.

Elsewhere, the attack achieved some success and, on the left, 50th Division, made good progress except where their right was exposed. On the right of the 47th Division’s front, part of the 15th Battalion and the 7th Battalion went forward and gained ground. Meanwhile, the enemy artillery was pouring a raging torrent of high explosive and shrapnel into the line. After consultation, it was decided to attempt to turn the enemy’s positions in the Wood by bombing round the flanks and the situation, and the outflanking proposals, were reported to Brigade and artillery assistance was requested. 141st Brigade ordered 19th Battalion to work round the left and 20th Battalion to work round the right. In conjunction with the turning movement on the flanks, the 17th Battalion and the London Irish were ordered to make a further frontal attack.
The combined frontal and flanking attacks were successful and, between 9 and 10am, the enemy along the London Irish front of the Wood and elsewhere began to surrender. However, snipers in shell holes and strong points in the Wood continued to harass the advance and Major JR Trinder, the London Irish Commanding Officer, was shot through the head while superintending the removal of the prisoners.
Troops of the 19th and 20th Battalions and the 8th Battalion, moving up as second assaulting troops, became involved in the fighting as enemy groups still held out in the Wood. 140th Trench Mortar Battery rendered very valuable assistance by firing 750 rounds into the Wood in 15 minutes and, a bombardment between 11 and 1130am, arranged for the Brigade against the north western portion of the Wood, was most effective. By 1225pm, the whole of High Wood was captured and several hundred Germans were taken prisoner together with six machine guns and two howitzers. The 141st Brigade was severely depleted by casualties and the survivors were scattered about the Wood in shell holes and trenches. Under a very heavy shell fire, they were hastily reorganised as one composite Battalion and, under the command of Lt Col Norman of 17th Battalion, they were sent forward to the first objective with orders to consolidate.
Major BMc M Mahon came up and took command of the remnants of the London Irish and, in conjunction with other units, the men consolidated the line 150 yards east of the Wood. The enemy shell fire considerably hampered the work but all ranks worked extremely well in spite of the very difficult and trying circumstances.
In front of the 140th Brigade, 7th Battalion and two Companies of the 15th Battalion occupied the first objective and men of the 9th Battalion linked up with the New Zealanders on the right and advanced to their objective: Flag Lane. By early afternoon, 6th Battalion had passed through 8th Battalion and were well forward; 24th and 21st Battalion, under the command of Lt-Col Kenny, were moving up with a view to seizing the second objective; 50th Division intimated that they were moving forward to the Starfish Line.
The 24th Battalion, on the 141st Brigade front, and 21st Battalion on the right, attacked in the evening at about 6pm, under very heavy shell fire and without adequate covering fire. Heavy casualties occurred and the attack failed. 24th Battalion dug themselves in on a line about 200 yards beyond the first objective. 21st Battalion failed to take the Starfish and a portion of the Starfish Line to the westward. The exact disposition of the 24th Battalion was uncertain and London Irish patrols went out to establish the position. When night fell, consolidation and reorganisation was proceeded with as soon as possible.
During the day, the Division had sustained heavy casualties: those of the London Irish alone totalling 223 all ranks. The survivors of the London Irish, together with the remainder of 141st Brigade, spent the night of 15th/16th and the following day digging and consolidating a new line 200 yards in front of the Starfish Line. In consequence of heavy shell fire, it was not possible to connect the new trench on the right flank with 17th Battalion but this point was continuously patrolled and protected by a concentration of machine guns.
On the Divisional front, the task set for 16th September comprised the capture of a ridge running north east from High Wood to a point above Flers and Eaucourt L’Abbaye. The attack was made by three companies of the 23rd Battalion and one company of 22nd Battalion in waves and in excellent order. The Coughdrop, in which some of the men of 6th Battalion were found, was quickly passed and trenches in the immediate vicinity cleared of the enemy. Thereafter, the attack moved off its course and, although the left halted on its objective, the centre and right pushed forward until broken up.
The bulk of the 23rd Battalion were never seen again. The attack was misdirected, owing to inaccurate information as to the position occupied by the troops on the right flank of the Division and the 140th Brigade front line although confusion was excusable on account of the featureless nature of the ground and to the maze of trenches, old and new, which had to be traversed.
At 4pm, 142nd Brigade was ordered to take over the line held by 141st Brigade and, in the early hours of 17th September, 141st Brigade withdrew into the support area. The London Irish were relieved about 4am and moved back to Mametz Wood and, in the afternoon, a welcome draft of 96 other ranks reported.
To free troops of 140th and 142nd Brigades, at 438pm on 17th September, 141st Brigade was ordered by Division to take over the line of the first objective and, at 10pm, the London Irish relieved the 24th Battalion in the line east of High Wood.
Heavy rain set in on the evening of the 17th and the conditions of the ground rapidly deteriorated. Operations designed to secure Drop Alley and its junction with the Flers line were postponed – on account of the weather and the state of the ground – from 750pm on 17th September to 550am on the 18th and the attack on the Starfish Line was put back until 445am on 18th September.
The attack on Drop Alley and the Flers Line succeeded but the enemy retained possession of the actual junction of the Flers Line with Drop Alley. The attack on the Starfish Line, west of the Starfish redoubt, made in the darkness of early morning also succeeded, although the enemy counter attacked and reoccupied a good deal of the line but the ground was, however, made good later.
The exact situation of the posts and the disposition and strength of the various groups of men in the forward area was ill defined. Accurate location finding was made very difficult due to the maze of criss-cross trenches and by the absence of any dominating feature which might be used to assist identification. In these circumstances, constant reconnaissance work was necessary and many obscurities were cleared up by the valuable reports made by London Irish patrols sent out by Captains Totten and Watson.
19th September was a thoroughly uncomfortable day of shell fire and drenching rain and the trenches were converted into slushy ditches and no-man’s land into a sea of mud. On this day, the Battalion reported to Brigade:
“During the last 24 hours weather conditions have impeded work on the trenches very considerably. In many places, men are up to their knee in mud and water, Work is being carried on to keep the trenches as good as possible under the circumstances. There is a great deal of water in the front line. Sandbag dumps have been made by all companies and immediately the ground is possible to work on, re-vetting will be commenced.”
Intelligence.
“Last night was quite quiet except for intermittent shelling. There are snipers out in shell holes in front of our lines. One was thought to be spotted about three hundred yards in front and a patrol went out but was unable to locate him.
About 1030, there was persistent shelling of our front and support lines resulting in several casualties. Patrol reports that the new trench, commenced by Pioneer Battalion, averaged four feet deep and two and a half foot broad. Patrol reports that it runs about 300 yards in front of our present front line. Maps of the position and particulars of how garrisoned are attached. Machine gun on either flanks of the front line and two in support.
Signed
G Skevington
Captain and Adjutant
19th Sept 1916, 1225pm. “
Relief from the Battle and the Cost to the Battalion.
At 2am on 20th September, the 1st Cameron Highlanders took over the line held by the 18th, 19th and 20th Battalions. Dog tired and plastered from head to foot in mud, the men of the London Irish set out for billets. The troops moved along the path by the side of Bedford Trench, along High Alley and through Bazentin-le-Grand and the centre of Mametz Wood to Bottom Wood. At the Transport line, situated in the south east corner of Bottom Wood, hot tea was provided for the men and, refreshed by the welcome beverage, the men continued to Albert.
Notwithstanding the gruelling time which the men had undergone, and the filth with which they were covered, the men marched extremely well and earned the high praise of the Major General and the Brigadier General for their unquenchable spirits and disciplined bearing.
The High Wood attack on 15th September was very costly so far as the 141st Brigade was concerned and the operations on that day reduced a magnificent Brigade of highly trained and experienced troops to the strength of less than one good Battalion.
The failure of the tanks was a most unfortunate feature. Their use deprived the attacking Battalions of proper artillery support and gave the enemy warning of the impending assault. The result was a very costly operation and a setback which prejudiced the Division’s arrangements for subsequent attacks. The Major General and Brigadier General Thwaites, foresaw that tanks would experience difficulty but the warning was disregarded by Higher Authority
Casualties.
Casualties sustained by the London Irish amounted to 234 all told:
Officers killed: Major JR Trinder, Captain PAC Maginn, 2nd Lt WF Plummer, 2nd Lt AJ Cunningham.
Officers wounded: 2nd Lt H Banks, 2nd Lt H Crawford, 2nd Lt AC Woodrow, 2nd Lt RC Munro (later died), 2nd Lt HC Tyson, 2nd Lt HC Tyson.
Other Ranks killed: 52.
Other Ranks Wounded: 138.
Other Ranks missing: 31.
Lt-Col AP Hamilton (19th Battalion), late Adjutant of the London Irish Rifles was also killed.
Rest at Bresle.
The Battalion moved to Bresle on 21st September and reoccupied its old billets. A little time was needed to rest the men, re-equip and to give the draft of 150 men – which arrived on 24th September – some intensive training, before proceeding to the line for further fighting.